Short version
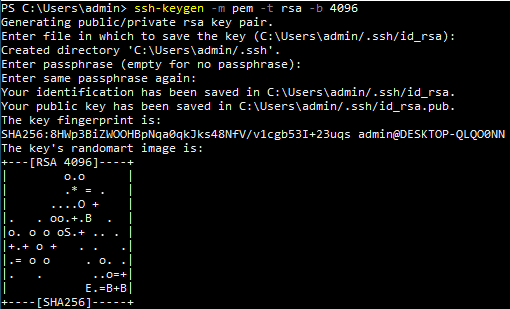
ssh-keygen -m pem -t rsa -b 4096
Store on server with Linux or Windows commands below
Connect with ssh ssh <username>@<server>
Creating a key
This process is the same for Windows (Server 2019/Windows 10 build 1809 or later) and most Linux distros.
You can use ssh-keygen -m PEM -t rsa -b 4096 to create a key.
ssh-keygen -m pem -t rsa -b 4096
-m: Key format
-t: Key type
-b: Number of bits in key (ignored for ECDSA-SK, Ed25519 and Ed25519-SK)
You’ll be prompted for a location to save your key and a passphrase for the private key.
Passphrases are optional but recommended.
Be careful if you’re prompted to overwrite any files. Consider using a different filename with -f instead.
By default this will create two files in <user home>/.ssh/
Linux: /home/admin/.ssh/
Windows: C:\Users\admin\.ssh\
You may need to enable showing hidden files in file explorer if you can’t see this directory.
The default filenames use the format id_<algorithm name>.
For example, the command above uses RSA so the filenames will be id_rsa.
id_rsa.pub: Your public key. This file will be stored on servers.
id_rsa: Your private key. Treat this like a password. If anyone gets this file they can be you. This is why it’s recommended to use a passphrase when creating a key.
Check the ssh-keygen man page for more options.
Two worth mentioning are:
-C: Comment to append to the key file
-f: Filename to use for the keys generated. A second file .pub file will be generated with the same name.
Here’s more information on key types.
The short version is do not use DSA. If you accept the defaults 🙂 and use RSA, this is still considered secure but you’ll want to use a longer key length (ex: -b 4096).
Storing the key on the server
The public key needs to be on the server you’re connecting to.
The steps below assume you have SSH access to the target system and your public key is <user home>/.ssh/id_rsa.pub
Linux
Use ssh-copy-id -i ~/.ssh/id_rsa.pub <username>@<server> to store the key in ~/.ssh/id_rsa.pub on <server>.
ssh-copy-id -i ~/.ssh/id_rsa.pub <username>@<server>
Windows
Windows does not have ssh-copy-id by default.
You can copy the key with get-content ~\.ssh\id_rsa.pub | ssh <username>@<server> “cat >> ~/.ssh/authorized_keys”
get-content ~\.ssh\id_rsa.pub | ssh <username>@<server> "cat >> ~/.ssh/authorized_keys"
Here’s an explanation of that command
get-content ~\.ssh\id_rsa.pub: Get content of the file <user home>\.ssh\id_rsa.pub
|: Pipe (send) output of the get-content command to the next command
ssh <username>@<server>: Connect to <server> as <username>
cat: Print output from get-content command that was piped to SSH command
>> ~/.ssh/authorized_keys: Append (>>) output from cat (output received from get-content pipe) to <user home>/.ssh/authorized_keys. A single > would overwrite the file.
Check if the key has been added
SSH to the server and run cat ~/.ssh/authorized_keys. This output should now include your public key created in the earlier step.
cat ~/.ssh/authorized_keys
Connecting
You can connect with ssh <username>@<server>
ssh <username>@<server>
If the key isn’t stored in your .ssh directory you can use ssh -i <path to key> <username>@<server>
ssh -i <path to key> <username>@<server>
You may need to fix your key file permissions to RW for user only. You can do this with chmod 600 <key> or by moving the file to somewhere in your user/home directory (desktop for example). If this is outside of your user/home directory it could inherit permissions to allow access other users and groups.
chmod 600 <key>
If you have a passphrase on your private key (and you should!) SSH will prompt you for the password when connecting.
ssh-agent
Storing private key passphrases in ssh-agent
You can use ssh-agent to store the key passphrase on your system. There are tradeoffs. If you’re doing this on a shared system assume anyone with admin access will have access to your private key.
Check that the ssh-agent service is running and the startup type with Get-Service ssh-agent | fl *.
Enable it with Set-Service ssh-agent -StartupType Automatic then start it with Start-Service ssh-agent if needed.
Get-Service ssh-agent | fl *
Set-Service ssh-agent -StartupType Automatic
Start-Service ssh-agent
Add the key with ssh-add <user home>\.ssh\id_rsa
ssh-add $env:USERPROFILE\.ssh\id_rsa
This works with $env:USERPROFILE but not ~ in Windows. No idea why, ask MS.
Once the private key has been added to ssh-agent you can encrypt and delete the unencrypted version.
Make sure to back up the private key before deleting it.
ssh-agent does not have an export method. This is technically still possible by dumping memory but that’s way out of the scope of this post.
Removing keys from ssh-agent
List any keys managed by ssh-agent with ssh-add -l
ssh-add -l
Remove an individual identity with ssh-add -d <user home>\.ssh\id_rsa
ssh-add -d $env:USERPROFILE\.ssh\id_rsa
Remove all identities with ssh-add -D
ssh-add -D


