Requirements
- IC-705
- USB cable
- Virtual Serial Port Emulator
- soundmodem
- hamlib
- gpredict
- UISS
This post does not include antenna or rotor control.
You could probably adjust rigctld to use this guide for other radios but I haven't tested it.
Gpredict and Virtual Serial Port Emulator are optional if you don't want to correct for doppler shift.
You can set your radio to FM-D on 145.825 and get most of the pass.
IC-705 Setup
You can skip this part if you're already setup for other digital modes.
Download and install the IC-705 USB drivers.
You'll need a micro USB cable to connect the IC-705 to your computer. Nothing special just make sure it's a data cable and not charging only.
I'm using this one with a few clip on ferrites. You probably already have one that will work.
Do not connect the rig to your computer before installing the driver. It's not the end of the world if you already did, just unplug it before installing.
COM Port Settings
Open Device Manager (WinKey+X > M) after installing the drivers and rebooting.
Expand Ports (COM & LPT) then plug in the rig.
You should see two new devices called IC-705 Serial Port A/B.
Take note of the one with (CI-V) in the name. If they have the same name you usually want the one with the higher COM port number.
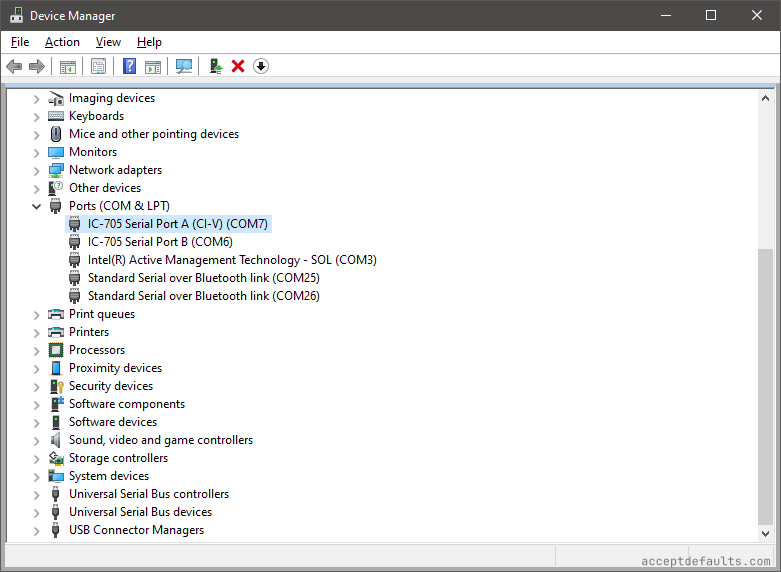
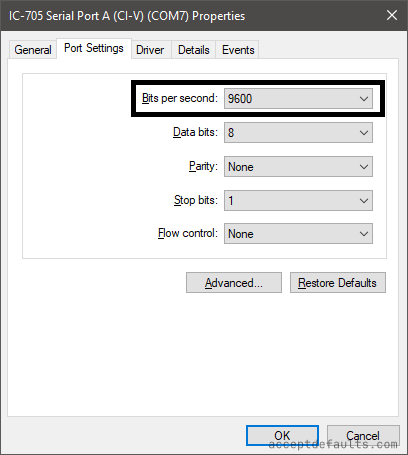
Double click the (CI-V) COM port and go to the Port Settings tab.
Change the Bits per second to 9600 if it's not already set.
Click OK and close Device Manager.
Soundcard Settings
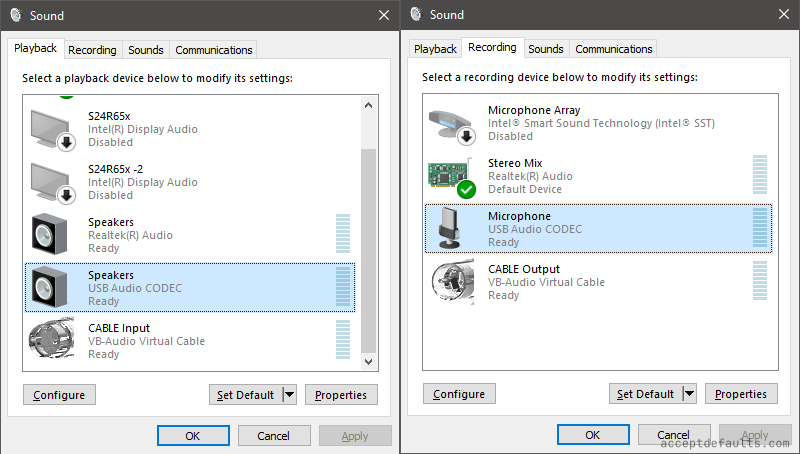
Open sound settings in windows (WinKey+R > mmsys.cpl)
mmsys.cpl
You should have two USB Audio Codec devices, one under Playback and another under Recording.
Take note of their names or rename them by double clicking the device and changing the name on the window that pops up.
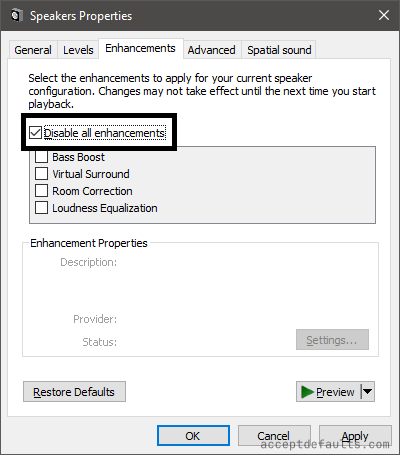
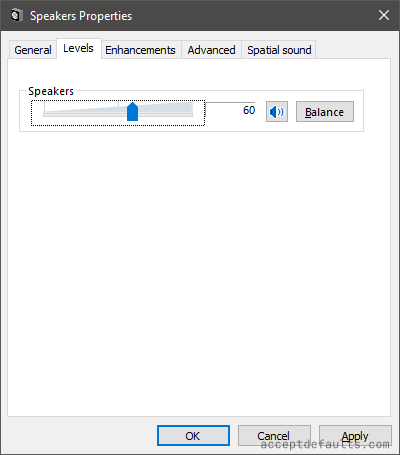
Double click the playback device and go to the Enhancements tab. Check the Disable all enhancements checkbox.
Go to the Levels tab and adjust the volume to roughly 50-60. This is where you'll adjust the output volume for ALC after you start TXing.
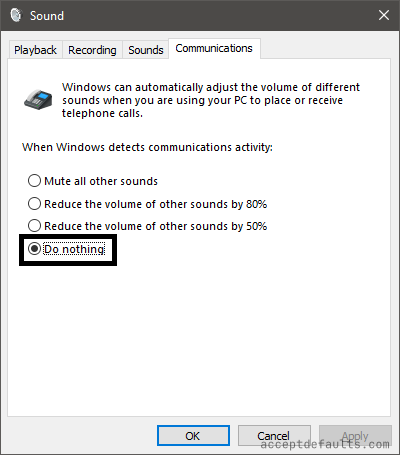
Check the Communications tab while you're here.
Make sure Do nothing is selected. Windows sees your rig's audio as a microphone and will reduce or mute your volume (output audio to rig) when it's active which can cause issues when transmitting.
Soundmodem
Download soundmodem114.zip and ptt-dll.zip from soundmodem's website.
Extract soundmodem114.zip to a folder (ex: c:\HAM\soundmodem\)
Extract ptt-dll.zip to the same folder as soundmodem.exe (ex: c:\HAM\soundmodem\)
Soundmodem Settings
Open soundmodem.exe in the location you extracted it earlier (ex: c:\HAM\soundmodem\soundmodem.exe)
Go to Settings > Devices
Change Output device and Input device to the USB Audio Codec devices from earlier in the rig setup.
Enable TX rotation and Single channel output. Color waterfall is cool but optional.
Enable AGWPE Server and KISS Server if not already enabled. Leave the default ports at 8000 and 8100.
Uncheck Dual PTT
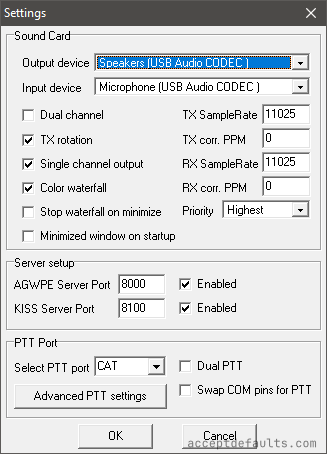
Select CAT in the Select PTT port drop down. Click OK then open Settings > Devices again. You will now be able to click the Advanced PTT settigns button.
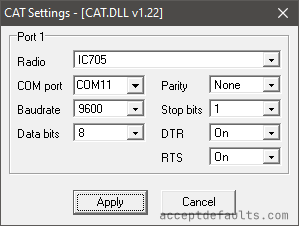
Set radio to IC705
Change COM port to one of the virtual COM ports created above and change the COM port speed if needed
Virtual Serial Port Emulator
Skip to the UISS section if you don't want to correct for doppler.
You will need to setup a virtual COM port splitter for gpredict rig control and soundmodem PTT control.
Download and install Virtual Serial Port Emulator
Open VSPE after installing. If you can't find the shortcut the default location is C:\Program Files\Eterlogic Software\Virtual Serial Ports Emulator (x64)\VSPEmulator.exe
C:\Program Files\Eterlogic Software\Virtual Serial Ports Emulator (x64)\VSPEmulator.exe
Continue with evaluation if unregistered. The unregistered (free) version of VSPE has two limitations.
The only one that applies to this setup is not loading configuration files. You will need to setup the virtual serial port every time. Try this with the unregistered version a few times before buying it. This is only needed for adjusting doppler. You can do this manually and let soundmodem use the IC-705's COM port if you don't want to buy VSPE.
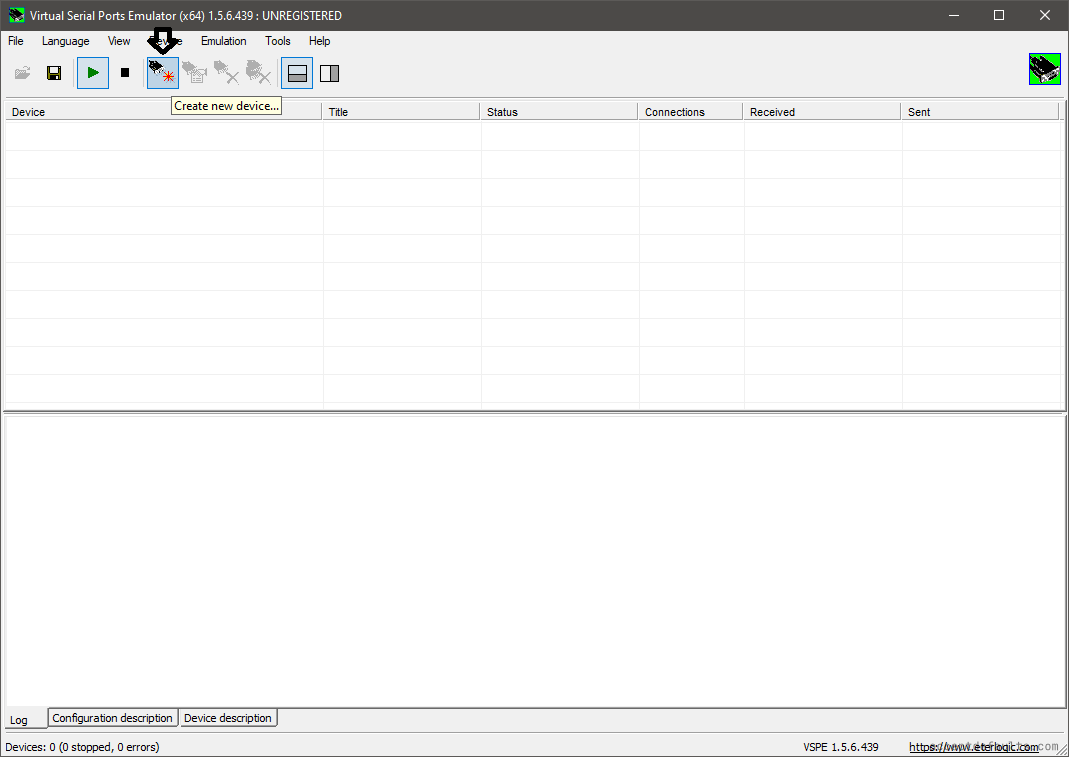
Click the Create new device button and select Virtual Splitter
Select the IC-705's CI-V COM port from the steps above under COM port to use as a data source.
Change the speed in settings to match the COM port's speed if needed.
Choose a free COM port under Selected virtual port settings and click Add virtual port. Select another free COM port to add a second port. Do not click Add virtual port for the second port.
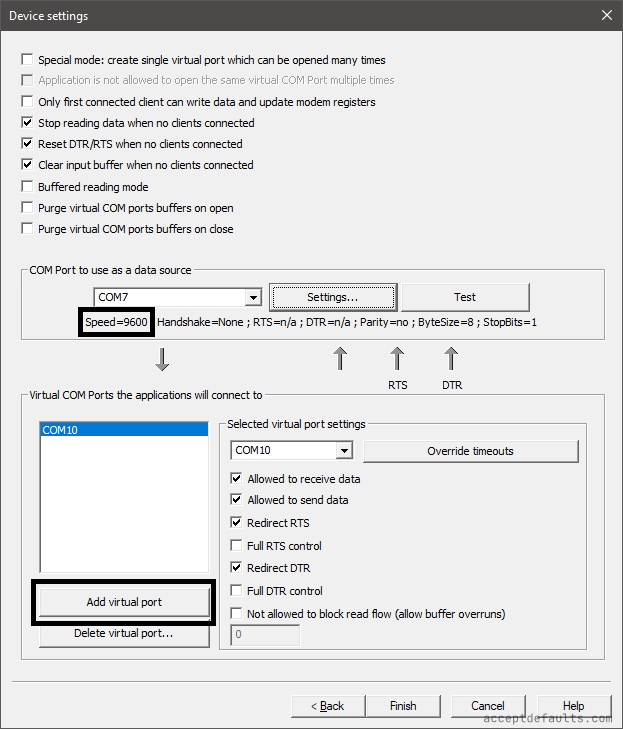
Click Finish after adding both virtual COM ports. Leave VSPE open.

If you use COM10 and COM11 for the virtual COM ports you can copy and paste examples from the steps below
rigctld
Skip to the UISS section if you don't want to correct for doppler.
rigctld is part of hamlib. Download the .zip of the latest hamlib release.
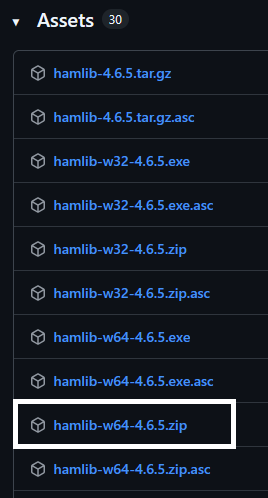
Extract the hamlib .zip to a directory. It does not need to be the same directory as soundmodem or gpredict. (ex: c:\HAM\hamlib\)
Open the hamlib folder. Find rigctld.exe and create a shortcut.
Make sure you're using rigctld. The other rigctl* exes (including rigctl.exe) will not work!
Right click the shortcut you created and go to Properties. Go to the Shortcut tab if not already selected.
You will need to add a few items at the end of the .exe in the Target field.
c:\HAM\hamlib\bin\rigctld.exe rigctl.exe -m 3085 -r <COM Port from virtual splitter> -s <COM port speed> -t 4533 -vvv
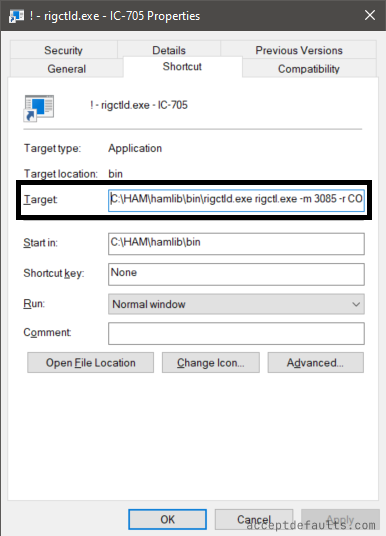
Here's a version you can copy and paste if you used COM10 in Virtual Serial Port Emulator earlier.
c:\HAM\hamlib\bin\rigctld.exe rigctl.exe -m 3085 -r COM10 -s 9600 -t 4533 -vvv
Let's walk through these settings. You can skip ahead to the gpredict settings if you don't care what the options do.
Note that rigctld.exe rigctl.exe are both in the target field. This is not a mistype.
-m: model device ID - You can list all device ids with rigctld -l
-r: rig file (device) - This makes more sense in linux it translates to a COM port in windows.
-s: serial speed
-t: tcp port number to listen on for rig commands
-vvv: verbose level 3 - This is optional. More vs for more verbose. See the diagnostics section for more info.
gpredict
Skip to the UISS section if you don't want to correct for doppler.
Download the latest releast of gpredict
Extract the .zip to a directory. (ex: c:\HAM\gpredict\)
Open Virtual Serial Port Emulator and the rigctld shortcut before opening gpredict.
Ground Station
Go to Edit > Preferences
Optional: Check Show local time instead of UTC
Go to the Ground Stations tab and click Add New
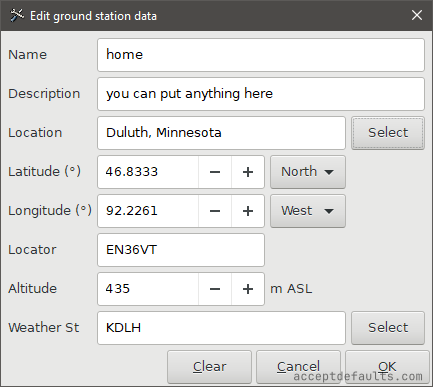
Enter your ground station data
Name and Description are for your reference only
Click the Select button next to Location and select your closest location. This will auto-populate the other fields.
Alternatively you can enter your gridsquare under Locator which will update your lat and long. You will need to enter your altitude manually.
Check Default on the ground station you created and delete the sample ground station.
Radio Config
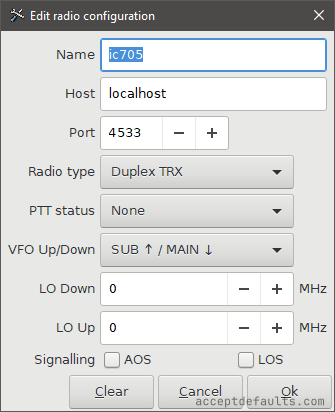
Open the Interfaces tab on the left and click Add new in the Radios tab.
Use the settings in the screenshot below
Host: localhost
Port: 4533
Click OK to close the preferences window. Restart gpredict to relaod the ground station settings.
Satellites List
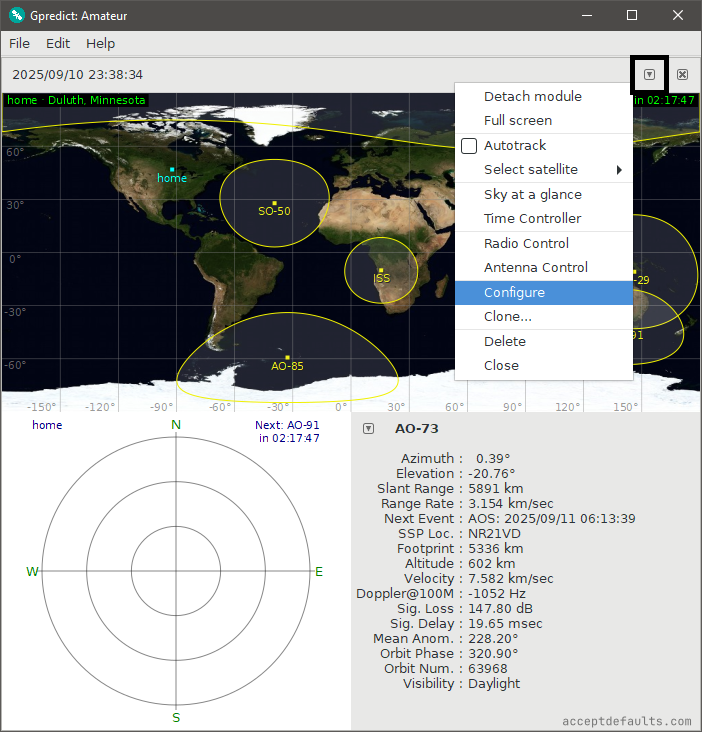
Click the down arrow in the top right corner of the map and select Configure.
You can reopen the map by going to File > Open module if you clicked the X
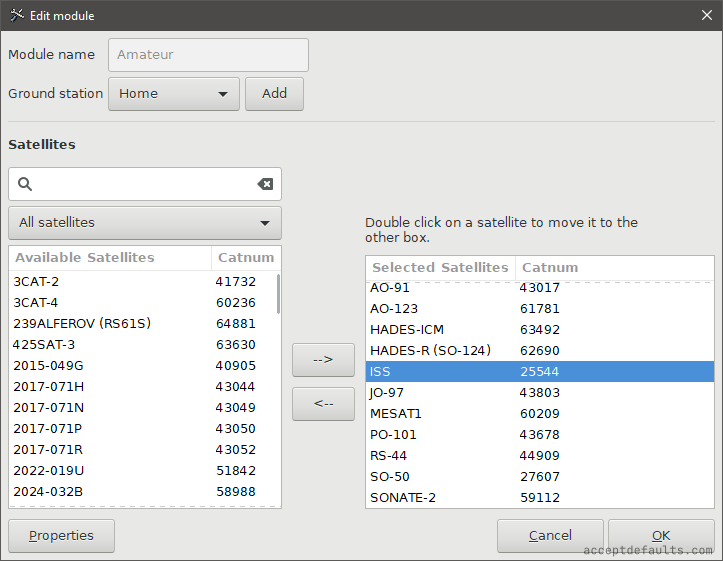
Select your ground station from the list if you have multiple.
Gpredict will track the satellites on the right list. Add/remove any other satellites.
You only need ISS for the ISS but there are other digital satellites up there.
Click Edit > Update transponder data then Edit > Update TLE data from network. Make sure to update transponder data first.
If you skipped ahead, don't do this with track enabled in radio control. The predicitons can go negative while it's updating and it can freeze hamlib.
Radio Control
Click the down arrow in the top right corner of the map and select Radio Control.

Select ISS and Mode V/V APRS from the target list.
Click the Track button next to the satellite drop down then the Engage button next to device.
Your radio will change to VFO mode with split enabled.
You may need to change to Data (FM-D) on the 705 to transmit audio from your PC.
![]()
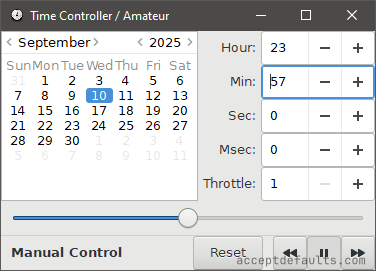
You can change the time by clicking the down arrow in the top right corner of the map and selecting Time Controller.
Click the pause button then adjust the time to simulate passes. Click Reset to go back to real time.
UISS
Download and install UISS from ON6MU's website.
The site looks old but it's legit.
Open UISS and enter your callsign when prompted. It will take a second to load.
You may see an error if it opens a second soundmodem window. You can click OK on the error and close it.
Go to Setup > UISS...
Select UZ7HO Soundmodem under Software Modem Preference and update the soundmodem location to the one you unzipped earlier (ex: c:\HAM\soundmodem\soundmodem.exe)
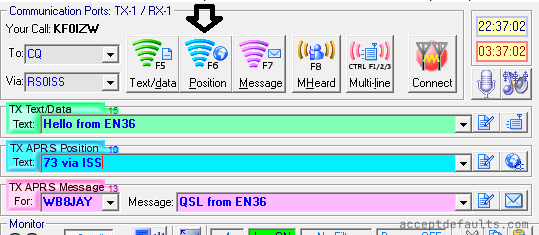
Click the globe icon next to TX APRS Position to edit your location settings.
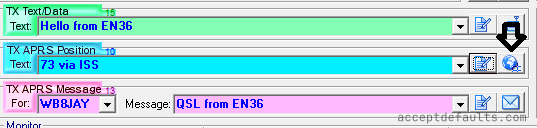
Click Position (F6) to send and APRS beacon.
All other messages will display in the blue monitor window. You can set preset messages with the notepad icon in each line.
You can open the APRS Messages window by clicking the mail icon on the TX APRS Messages line.

UISS will play a notification when you hear any of your packets digipeated.
Replying
Callsigns will appear in the MHeard table when you hear them.
Double click the call in the MHeard table to add it to the TX APRS Message drop down then click Message (F7) to send the message.
Checking Messages
You can check ariss.net to see if your packet was heard.
Beacons will also appear on aprs.fi or other APRS websites.
Happy APRSing!
73 de KF0IZW