Skip to the commands section for the short version.
Depending on the switch you'll need a USB micro cable or USB to console cable.
All Amazon links on this post are affiliate links.
You will also need something to connect to the switch over console connection. I'm using PuTTY in this post.
If you use Chocolatey:
choco install putty
Now might be a good time to update the firmware if it's out of date. If you're concerned about logging in without HTTPS see this post on updating with TFTP.
Resetting the switch
This step is optional. Bend a paperclip into a U shape or use two SIM eject tools.
Make sure you have a config backup before doing this!
Hold the Clear and Reset buttons until all lights on the switch light up.
Release the Reset button.
Keep holding the Clear button until the Test LED starts to flash then release the Clear button.
The switch will reboot with a factory default config.
Connecting to the switch
Connect the USB to console adapter (or USB cable). Open devmgmt.msc and look for Ports (COM & LPT) > USB Serial Port (COM#). You'll need the COM# to connect with putty.
![]()
Open putty then select Serial under connection type and enter the COM# from the step above.
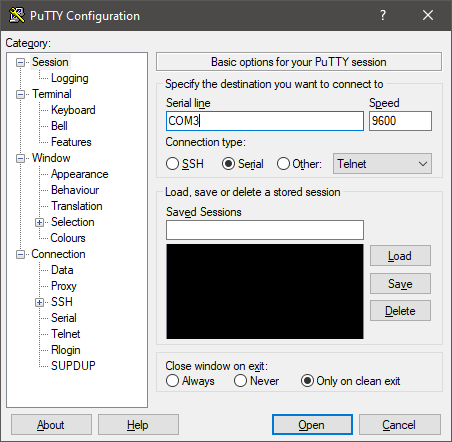 Power on the switch if you haven't already.
You'll see some text go by until you see the "Waiting for Speed Sense. Press twice to continue." message. If the switch was already powered on and you do not see any text it's most likely already sitting at this message.
Press enter twice and once more for the MOTD. Login if needed. Enter config to enter config mode.
config
![]()
Commands
Depending on the switch you will need to use the crypto host-cert (older) or crypto pki (newer) command. You do not need to run both.
Zeroize old cert to remove it.
crypto host-cert zeroize
or
crypto pki zeroize
Create new self signed certificate
crypto host-cert generate self-signed <start date (mm/dd/yyyy)> <end date (mm/dd/yyyy)> <common name> <org unit> <org name> <org city> <org state> <org country code (ex:us)>
or
crypto pki enroll-self-signed certificate-name <cert-name> valid-start <mm/dd/yyyy> valid-end <mm/dd/yyyy> subject common-name <name>
If you see an RSA certificate error you can create one with
crypto key generate cert
Enable SSL in config
Enter config mode
config
Use web-management ssl to enable HTTPS on the web server.
web-management ssl
Optional: use no web-management plaintext to disable HTTP on the web server.
no web-management plaintext
This only disables HTTP. It does not redirect HTTP to HTTPS.
Depending on the model of your switch you may lock yourself out if it's using an unsupported cypher. You can use web-management plaintext to re-enable HTTP if this happens.
Run write mem to save changes.
write mem